

On this page
- Visa-Free or eVisa? How to Know Which One Applies to You
- What You Need Before You Start the Application
- Step-by-Step: Completing the Japan eVisa Application Online
- Fees, Payment, and Processing Times
- Visit Japan Web — The Digital Entry Form You Must Complete Before Landing
- Arriving at Narita or Haneda: What Happens at Immigration and Customs
- Getting from the Airport into Tokyo After Clearing Immigration
- 2026 Budget Reality: eVisa Costs and Entry-Related Expenses
- Common Mistakes That Get Applications Rejected or Delayed
- Frequently Asked Questions
Japan received a record number of foreign visitors in 2025, and the surge has not slowed heading into 2026. With that popularity comes a flood of misinformation online — particularly around the Japan eVisa. Many travelers from visa-exempt countries waste hours trying to apply for an eVisa they do not need. Others who genuinely require one leave it until the week before departure and run into processing delays. Before you book flights, you need to know exactly which category you fall into, and if you do need the eVisa, how to complete the process without errors that cause rejections.
Visa-Free or eVisa? How to Know Which One Applies to You
Japan has no visa on arrival. That single rule trips up a lot of travelers. Every visitor must either hold a visa before boarding or qualify for visa-free entry — there is no third option at the gate.
Citizens of most Western countries fall under the visa-free short-term stay arrangement. This covers tourists, people on short business trips, and those visiting family or friends — but not anyone intending to work for pay in Japan. The standard allowance is 90 consecutive days. A smaller number of nationalities have bilateral agreements that allow up to 180 days (Ireland and Mexico are the most commonly cited examples), but 90 days is the standard.
Countries whose citizens typically qualify for visa-free entry include: the United States, Canada, the United Kingdom, Australia, New Zealand, all European Union member states, Singapore, and South Korea, among many others. If you hold a passport from one of these countries, you do not apply for the eVisa. You simply show up at immigration with a valid passport, proof of your return or onward flight, and enough funds to cover your stay.
The Japan eVisa exists for citizens of countries that do require a visa for short-term stays, but whose nationals are permitted to apply through the electronic system rather than attending a consulate in person. As of 2026, this list includes countries such as Brazil, Cambodia, Saudi Arabia, South Africa, and the UAE, and the Ministry of Foreign Affairs of Japan (MOFA) continues to expand the list of eligible nationalities. The eVisa covers the same purposes as a standard short-term visa: tourism, visiting relatives, and short business trips.
The fastest way to confirm your status is to check the official MOFA website directly. Do not rely on third-party visa agencies for this check — go to the source.
What You Need Before You Start the Application
Trying to start the eVisa application before gathering your documents is a reliable way to end up submitting something incomplete. The system times out, and a rushed upload of a blurry passport scan is one of the most common causes of rejection. Get everything ready first, then open the application portal.
Here is exactly what you need to prepare as digital files before you begin:
- Passport biographical page scan: Your passport must have at least six months of validity remaining from your planned entry date into Japan. Scan the main data page clearly — no shadows, no cropping of the edges.
- Digital passport photograph: Taken within the last six months. Plain light background, full face visible, no headwear. Standard passport photo dimensions apply. A JPG file is typically required.
- Confirmed flight itinerary: Round-trip tickets or onward tickets showing your departure from Japan. A booking confirmation with your name and flight numbers is sufficient — you do not need a fully paid ticket in every case, but a confirmed booking is expected.
- Accommodation confirmation: Hotel booking confirmations for every place you plan to stay in Japan. If you are staying with a host, a letter from that person including their full name, address, phone number, and relationship to you is required instead.
- Bank statements: The last three months of statements from your main bank account, showing sufficient funds to cover your entire trip. There is no fixed minimum stated officially, but immigration officers expect to see that you can support yourself throughout your stay.
- Travel itinerary: A written plan of where you are going and what you intend to do. It does not need to be a minute-by-minute schedule — a clear day-by-day outline covering your main destinations is enough.
- Invitation or guarantee letter (if applicable): If your visit involves a business meeting, or if a Japanese resident is hosting you, a formal letter from that company or individual is required. For business trips, this typically comes from the Japanese company on their letterhead.

All documents should be in PDF or JPEG format. Check the file size limits on the portal before uploading — oversized files will be rejected by the system.
Step-by-Step: Completing the Japan eVisa Application Online
The entire Japan eVisa application is handled through the official MOFA portal at evisa.mofa.go.jp. There is no physical component — no dropping off documents at a consulate, no waiting in queues. Everything happens online.
- Create your account. Go to the portal and register using a valid email address. You will receive a verification email — click the link before proceeding. Set a secure password and save it somewhere safe, as you will need to log back in to check your application status.
- Start a new application. Once logged in, select the option to apply for a new visa. Choose “Short-Term Stay” as your visa category, then select the appropriate purpose (tourism, business, or visiting relatives).
- Fill in personal details. Enter your full name exactly as it appears on your passport, your date of birth, nationality, and all passport details including passport number, issue date, and expiry date. Any mismatch between what you enter here and your actual passport is grounds for rejection.
- Enter travel details. Provide your intended dates of entry and exit, the port of entry (Narita, Haneda, Osaka Kansai, etc.), and your accommodation address in Japan. If you are staying in multiple places, enter the first accommodation address.
- Answer the background questions. These cover previous travel history, any past visa rejections, and whether you have a criminal record. Answer truthfully and completely.
- Upload your documents. Upload each document in the designated section. After uploading, preview each file to confirm it is legible and complete. Do not skip this step.
- Review everything. Go through the entire application from the beginning before submitting. Check your name spelling, passport number, and travel dates one more time. The system does not allow edits after submission.
- Submit. Once you are certain everything is correct, submit the application. You will receive a confirmation email with an application reference number.

Fees, Payment, and Processing Times
The eVisa is not free, but the cost is modest compared to the time and expense of visiting a consulate in person. As of 2026, the fee structure is as follows:
- Single-entry eVisa: Approximately JPY 3,000
- Multiple-entry eVisa: Approximately JPY 6,000
Payment is made online through the portal. Accepted cards include Visa, Mastercard, JCB, American Express, and Diners Club. There is no option to pay by bank transfer or cash. The payment page is integrated directly into the eVisa system — you do not need to go to a separate website. Keep a record of your payment confirmation.

Processing time is typically 5 to 7 business days from the date of submission and payment. That said, peak seasons — Golden Week (late April to early May), Obon (mid-August), and the autumn foliage period (October to November) — can see longer queues. If the system needs additional information from you, the clock essentially pauses while you respond.
The safe rule: apply at least two to three weeks before your departure date. Applying a month ahead is better. Do not treat the five-to-seven business day estimate as a guaranteed turnaround — it is an average, not a promise.
When your application is approved, you will receive a notification by email. Your eVisa will be available to download as a digital document — sometimes called a “Visa Issuance Notice.” Print a physical copy and also save it to your phone. Airline check-in staff may ask to see it before allowing you to board, and immigration officers at the Japanese port of entry will want to inspect it alongside your passport.
Visit Japan Web — The Digital Entry Form You Must Complete Before Landing
Regardless of whether you are entering Japan on a visa-free basis or on an eVisa, every international visitor is expected to complete their entry paperwork through Visit Japan Web before arriving. The URL is vjw.digital.go.jp.
By 2026, this system is fully operational and is the standard method for submitting the information that was previously collected on paper disembarkation cards and customs declaration forms. Paper forms still exist as a fallback in limited circumstances, but immigration counters at Narita and Haneda now process QR codes from Visit Japan Web as the primary method. Using the system shaves meaningful time off the immigration process — particularly during peak arrival periods when queues can stretch well past an hour for those who have not pre-registered.

Here is how to use it:
- Create an account at vjw.digital.go.jp using your email address.
- Register your traveler details: full name, passport number, nationality, and date of birth.
- Register your trip: airline, flight number, expected arrival date, and your first accommodation address in Japan.
- Complete the immigration declaration. This is the digital equivalent of the old disembarkation card. Fill in the required fields and the system generates a QR code for immigration. Screenshot it or save it to your phone’s photo library.
- Complete the customs declaration. Answer the questions about what you are bringing into Japan — alcohol, tobacco, cash over JPY 1,000,000, and any goods subject to duty. Another QR code for customs is generated. Save this one separately.
- Optional — tax-free shopping: You can link your passport information to streamline the tax refund process at participating stores. If you plan to shop seriously, this is worth setting up in advance.
Complete Visit Japan Web at least 24 hours before your flight. Doing it in the airport lounge while boarding has been called, accurately, one of the more stressful ways to spend the ten minutes before a gate closes.
Arriving at Narita or Haneda: What Happens at Immigration and Customs
Narita International Airport (NRT) and Haneda Airport (HND) handle the overwhelming majority of international arrivals into Tokyo. The process at both airports follows the same sequence, though the physical layout differs.
After your plane lands, you will follow signs toward immigration control. Have your passport, your eVisa printout (if applicable), and your Visit Japan Web immigration QR code ready before you join the queue — not while you are standing at the counter.

At the immigration counter, the officer will scan your QR code, check your passport, take a photograph, and scan your fingerprints. This biometric collection applies to almost all foreign visitors, including those from visa-exempt countries. The officer may ask basic questions: where are you staying, how long are you visiting, what is the purpose of your trip. Answer directly and briefly. The smell of nervous over-explanation is something immigration officers notice immediately.
After immigration, collect your checked luggage from the baggage carousel. Then proceed to customs. Scan your Visit Japan Web customs QR code at the electronic gate. If the gate accepts it and you have nothing to declare, you walk through. If you are selected for a bag check, an officer will inspect your luggage and ask about any specific items.
Once past customs, you are in the arrivals hall. This is where the practical decisions about getting into the city begin.
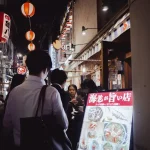
Getting from the Airport into Tokyo After Clearing Immigration
The arrivals hall at both Narita and Haneda can feel overwhelming after a long flight. The steam from freshly poured vending machine coffee rising in the cool arrivals concourse is a small comfort, but what you need is a clear plan for getting to your accommodation. Here is the practical breakdown:
From Narita (NRT)
- JR Narita Express (N’EX): The most direct train to central Tokyo, stopping at Tokyo Station, Shinjuku, Shibuya, and other major hubs. One-way tickets cost approximately JPY 3,000 to JPY 4,500 depending on your destination. The journey to Tokyo Station takes about 60 minutes.
- Keisei Skyliner: Runs to Ueno and Nippori stations. Pricing is similar to the N’EX. A good option if your accommodation is in the north or east of Tokyo.
- Limousine Bus: Slower than the trains but goes directly to many hotels and major stations. Useful if you have heavy luggage and your hotel is on a bus route.
- Taxi: Possible but expensive. Expect to pay JPY 20,000 to JPY 30,000 or more to central Tokyo. Not recommended unless you have an unusual amount of luggage or a specific reason.

From Haneda (HND)
- Keikyu Line: Connects Haneda directly to Shinagawa Station (Tokyo) and Yokohama. Tickets are typically under JPY 500. Fast and frequent.
- Tokyo Monorail: Runs to Hamamatsucho Station, where you transfer to JR lines. Also under JPY 500.
- Limousine Bus: Similar service to NRT, serving hotels across the city.
- Taxi: Considerably cheaper than from Narita to central Tokyo, but still ranges from JPY 6,000 to JPY 10,000+ depending on destination and time of day.
If you plan to use trains extensively during your stay, pick up a Suica or Pasmo IC card at the airport. These rechargeable cards work on JR trains, Tokyo Metro, private railways, and at most convenience stores. They eliminate the need to buy individual tickets for every journey.
2026 Budget Reality: eVisa Costs and Entry-Related Expenses
Below is a realistic picture of what it costs to handle the entry process, broken down by tier. These are 2026 figures.
eVisa and Entry Paperwork
- Single-entry eVisa fee: JPY 3,000
- Multiple-entry eVisa fee: JPY 6,000
- Visit Japan Web registration: Free
- Visa-free entry (if eligible): Free
Airport Transport (Budget / Mid-Range / Comfortable)
- Budget (from Narita): Keisei access express to Nippori, then Tokyo Metro — total around JPY 1,300 to JPY 1,500
- Mid-range (from Narita): JR Narita Express to central Tokyo — JPY 3,000 to JPY 4,500
- Comfortable (from Narita): Limousine Bus direct to hotel — approximately JPY 3,200 to JPY 3,600
- Budget (from Haneda): Keikyu Line or Tokyo Monorail — under JPY 500
- Mid-range (from Haneda): Limousine Bus to hotel — approximately JPY 1,500 to JPY 2,500
- Comfortable (from Haneda): Taxi to central Tokyo — JPY 6,000 to JPY 10,000+

Suica / Pasmo IC Card
- Initial purchase: JPY 500 deposit (refundable) plus whatever credit you add
- Recommended starting credit for a first week: JPY 3,000 to JPY 5,000
Common Mistakes That Get Applications Rejected or Delayed
The Japan eVisa system is straightforward, but a handful of avoidable errors account for the majority of rejections and delays.
- Applying too late. Five to seven business days is the average, not the minimum. Apply at least two to three weeks before departure. During Golden Week or peak autumn travel, build in even more time.
- Name mismatches. Your name on the application must match your passport exactly — middle names, hyphens, spacing, all of it. An immigration officer will compare the two documents character by character.
- Blurry or incorrectly sized document uploads. The most common technical failure. Scan documents in good light, check the preview, and confirm the file meets the format and size requirements before uploading.
- Incomplete accommodation details. Listing just a hotel name without a full address, or failing to provide a host letter for a private stay, is a common cause of delays. Include complete addresses for every place you plan to stay.
- Using a third-party visa service for a process you can do yourself. Several commercial websites charge significant fees — sometimes JPY 10,000 or more — to “assist” with eVisa applications. The official process is not complicated enough to justify this cost, and some third-party services have submitted applications with errors.
- Forgetting to save or print the eVisa after approval. The eVisa is a digital document, but you need to present it physically or on your device. An airline check-in agent who cannot see it may deny boarding.
- Misunderstanding eVisa limitations. An eVisa is for short-term stays only. It cannot be converted to a long-term visa, a work permit, or any other residency status after you arrive in Japan. If your plans involve working in Japan, a completely separate visa category applies — the Designated Activities visa for digital nomads is one option, but it requires its own distinct application process through a Japanese embassy.

Frequently Asked Questions
Can I apply for the Japan eVisa if I already have visa-free access to Japan?
No. The eVisa is only for nationalities that require a visa for short-term stays in Japan. If your passport grants you visa-free entry for up to 90 days — as it does for US, UK, Australian, Canadian, and most EU citizens — you do not need to apply for anything before travelling. Simply arrive with a valid passport and proof of onward travel.
How far in advance should I apply for the Japan eVisa in 2026?
Apply at least two to three weeks before your departure date. Processing typically takes five to seven business days, but during peak travel seasons — Golden Week, Obon, and autumn foliage months — it can run longer. Applying a full month ahead removes almost all timing risk and gives you time to respond if the system requests additional documents.
Is Visit Japan Web mandatory, or can I use paper forms at the airport?
Visit Japan Web is not legally mandatory as of 2026 — paper forms remain available as a backup. In practice, using the QR codes generated by Visit Japan Web significantly speeds up the immigration and customs process. At busy arrival times at Narita and Haneda, the difference can be 30 to 60 minutes. Complete it before your flight departs.
Can the Japan eVisa be extended after I arrive in Japan?
The eVisa itself cannot be extended. If you need to stay longer than your eVisa allows, you would need to apply for an extension of status of residence through the nearest Regional Immigration Services Bureau in Japan before your authorised period expires. Overstaying without doing this carries serious penalties, including deportation and a ban on future entry to Japan.
What happens if my Japan eVisa application is rejected?
MOFA will notify you by email. The rejection notice may or may not include a specific reason. You can reapply, but you should address the likely cause of rejection first — commonly a document issue, incomplete information, or a mismatch with passport details. If you continue to have difficulty, contact the nearest Japanese embassy or consulate directly for guidance before submitting again.